This tutorial is very, very similar to the two-hour unbound throw.
These are the differences:
1. I used coat-weight wool fabric (obtained during the fall sale at Pendleton’s mill store for $20/yard). That was after I bought the coat-weight fabric early in the month for an actual coat that is still not finished. But more later.
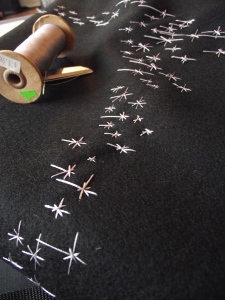
2. There is embroidery. (That’s what the extra hour is for.)
3. Because the fabric is so heavy, there are only two layers. Easy! Right?
Pretty easy!
Please refer to this tutorial as well as the ones it links to first. With those in mind…How To Make The Heaviest Patio Blanket Ever.
1. Obtain three yards of 55-inch wide heavy wool (or thereabouts; 45-inch, whatever, your blanket’s just narrower. NBD or get four yards and fold in half the other way). I bought mine by calling the efficient wool gnomes at the Pendleton Woolen Mill Store and placing an order. You can get yours however you like.
2. If embroidering, embroider your two pieces however you like. This was the most time-intensive part of the process. I used this little free form ‘starry night’ motif. (That’s what my mother called it when receiving the blanket as a present. I understand you will probably call it a bunch of asterisks). I was also extremely lucky to find a LOT of beautiful silk thread (in the picture) at the Resource Exchange in Philadelphia. There’s an ancient sticker on it that says $1.98/yard. Definitely that is not what I paid.
3. Lay your two pieces on top of one another, front sides facing.
4. Pin.
5. Sew around the edges, leaving four-inch gap.
6. Cut off corners inside of the seam allowance so you can poke those corners out more nicely.
7. Flip the blanket outside out and poke those corners out real nice.
8. Slip and/or blind stitch that hold closed and press the seams. (Always press the seams. I know taking the iron and ironing board out is the worst, THE WORST, part of sewing, but do it. It’s totally the difference between your stuff looking like ‘hey look mom don’t you like the blanket I made for your birthday’ and ‘oh, Wasted, I loved the blanket you gave me for my birthday, ZOMG did you make it?!’. )
9. Measure regular intervals on your blanket, and pin them (Like here, with Purl Bee‘s duvet. I was finishing the stitches as my mom was pulling up and then was like ‘happy birthday!!’ and forgot to take finished product photos.) I attempted 6-inch squares, but I don’t have one of those beautiful fat quilting rulers that they have and things got a little wonky. If you use thread that matches the wool, it will totally look fine. Those overcasts barely make an impression in the material.
10. Go get a beer. What comes next is pretty effing tedious but will keep your layers from slipping all over themselves when your mom is trying to keep herself warm. That means the side seams won’t experience too much stress and your blanket will last FOREVER and she has to always tell you how it’s so pretty and she’s so proud of you.
11. Near where each safety pin is, do an overcast stitch back and forth a few times using your machine, or stitch with your hand if you are mental. Keep drinking your beer.
11.5 (Optional). I handstitched about 3/4 from the seam edge all the way around using the matching thread and a running stitch. I liked the impression of a border, but over to you on how you want to handle this.
12. Finish! Give that shiz to your momma for her birthday.

