

This post is a long (long) time coming. But we’re at the half-year mark in our marriage and so I thought it was a good time to get over my guilt at never having posted a wrap of the wedding dress project and just do it.
It looked like this!


First up: The pattern.
I think at the outset I made a preeeeetty major mistake and decided to draft my own pattern despite never having drafted anything.
Bonkers.
I wanted something very, very simple, and I didn’t find any patterns similar to what I had in mind. In retrospect, I would definitely tell my October 2013 self to muslin a couple of existing patterns before trying to draft one.
Only because my sewing experience was so, so limited did I think this would be possible. It ended up being composed of many components, all detailed here. The brief rundown is:
-self drafted back bodice
–Marfy 3367 front bodice (the one from this dress)
–Colette Clovers waist band
–Vogue 8648 pencil skirt.
I had a lot of trouble starting this, and the majority of the time was taken up trying to get the pattern to a point that suited me. I’d really encourage anyone thinking of making their own wedding dress to start with a pattern that has has a few key components you’re looking for, understanding that you’ll have to modify (hack) it a bit. Here, you can see various stages:
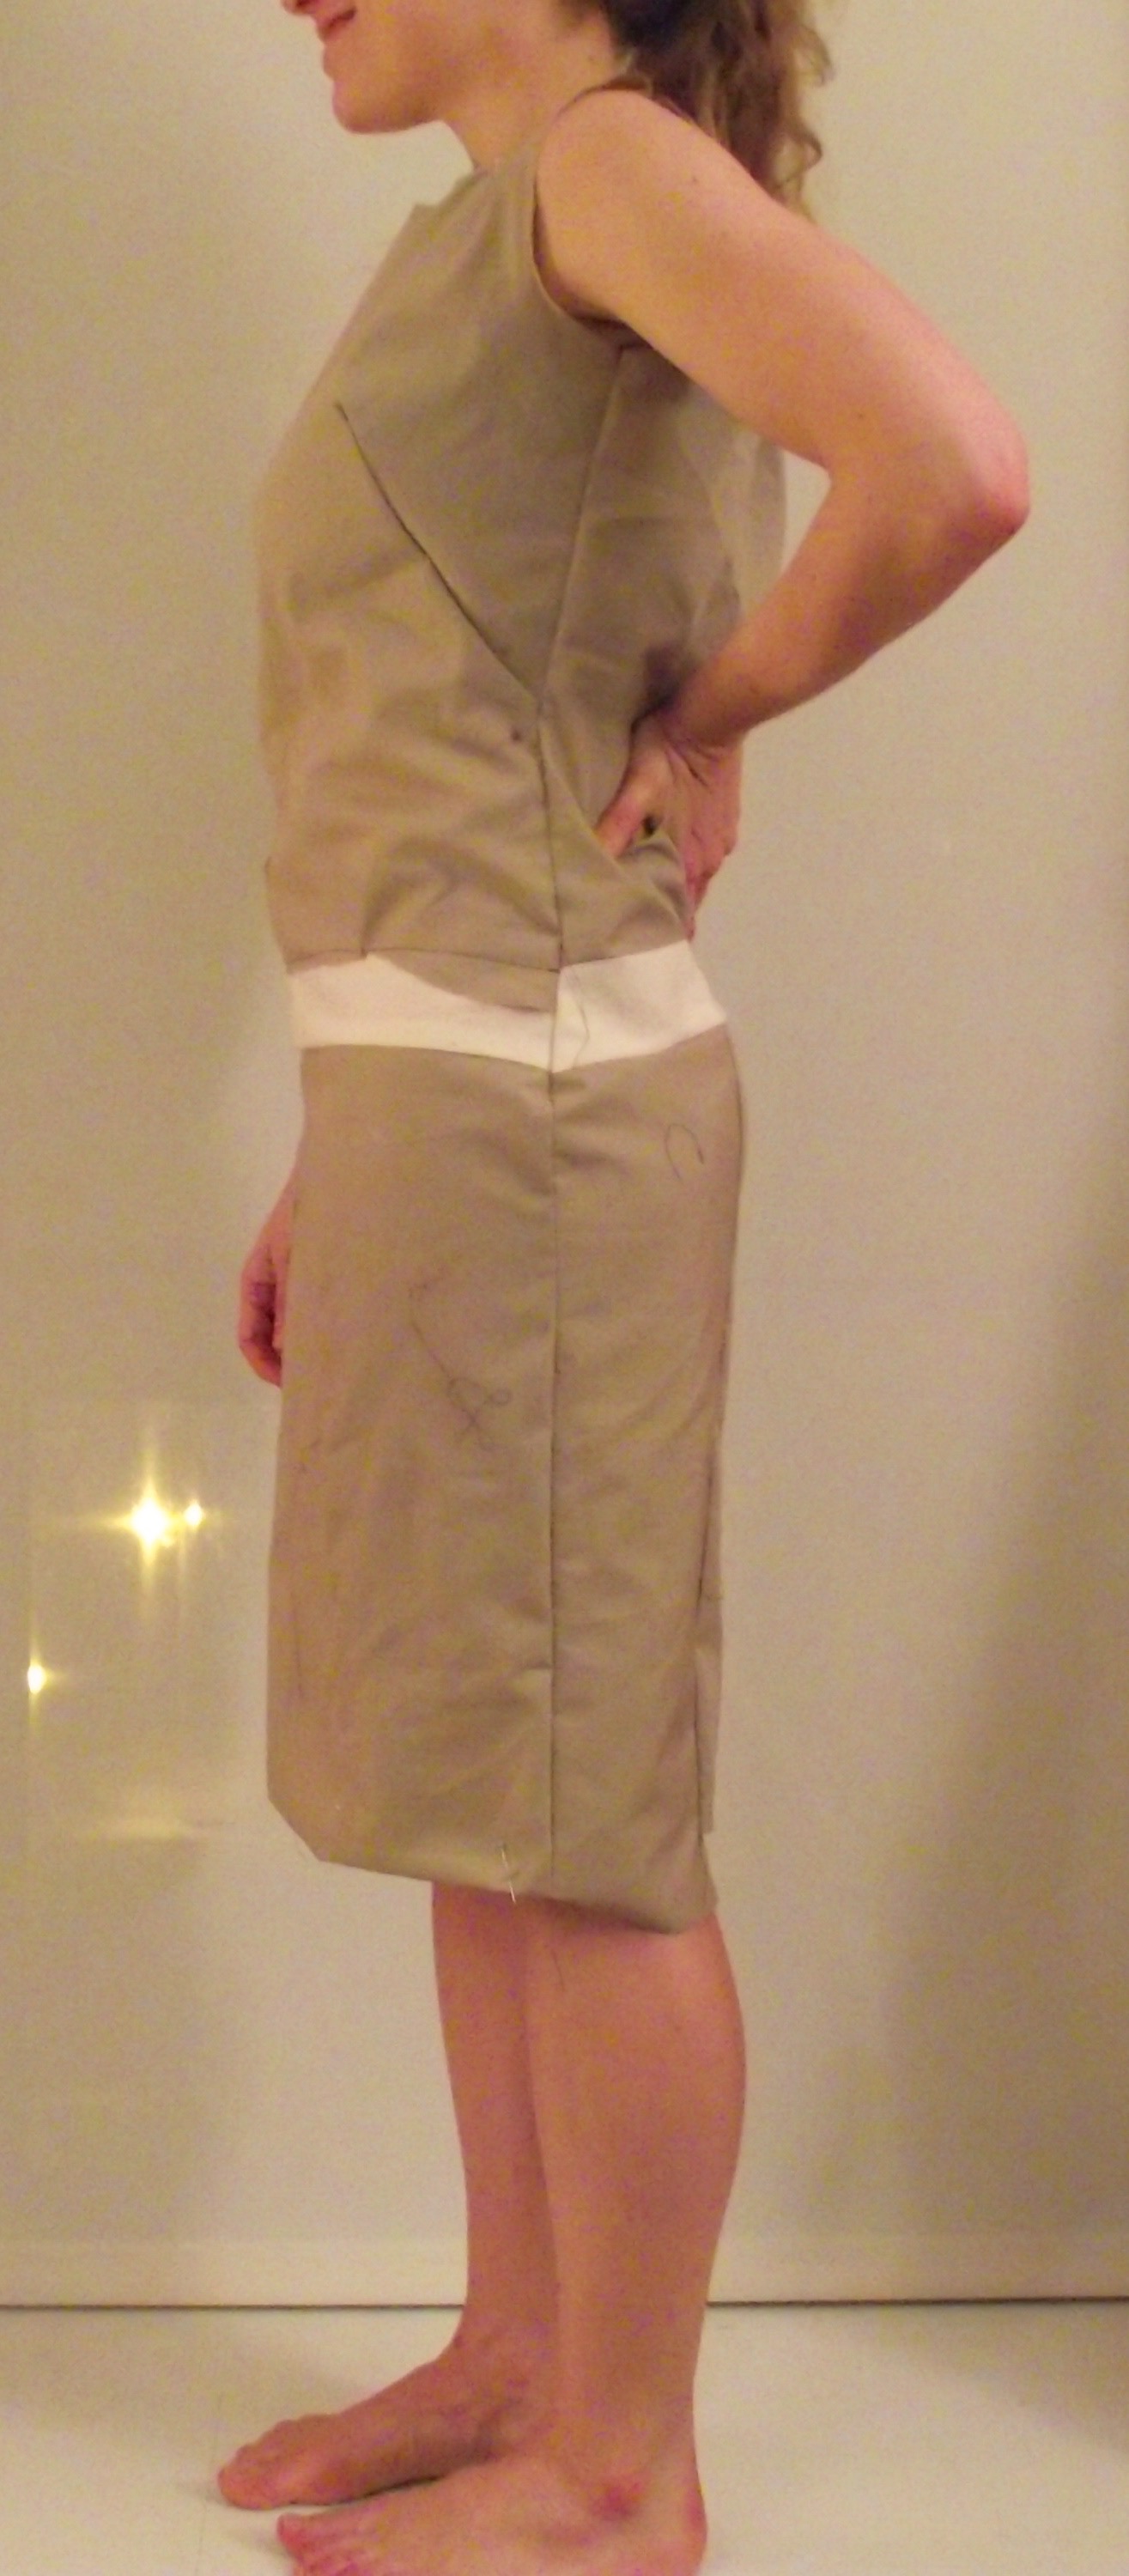
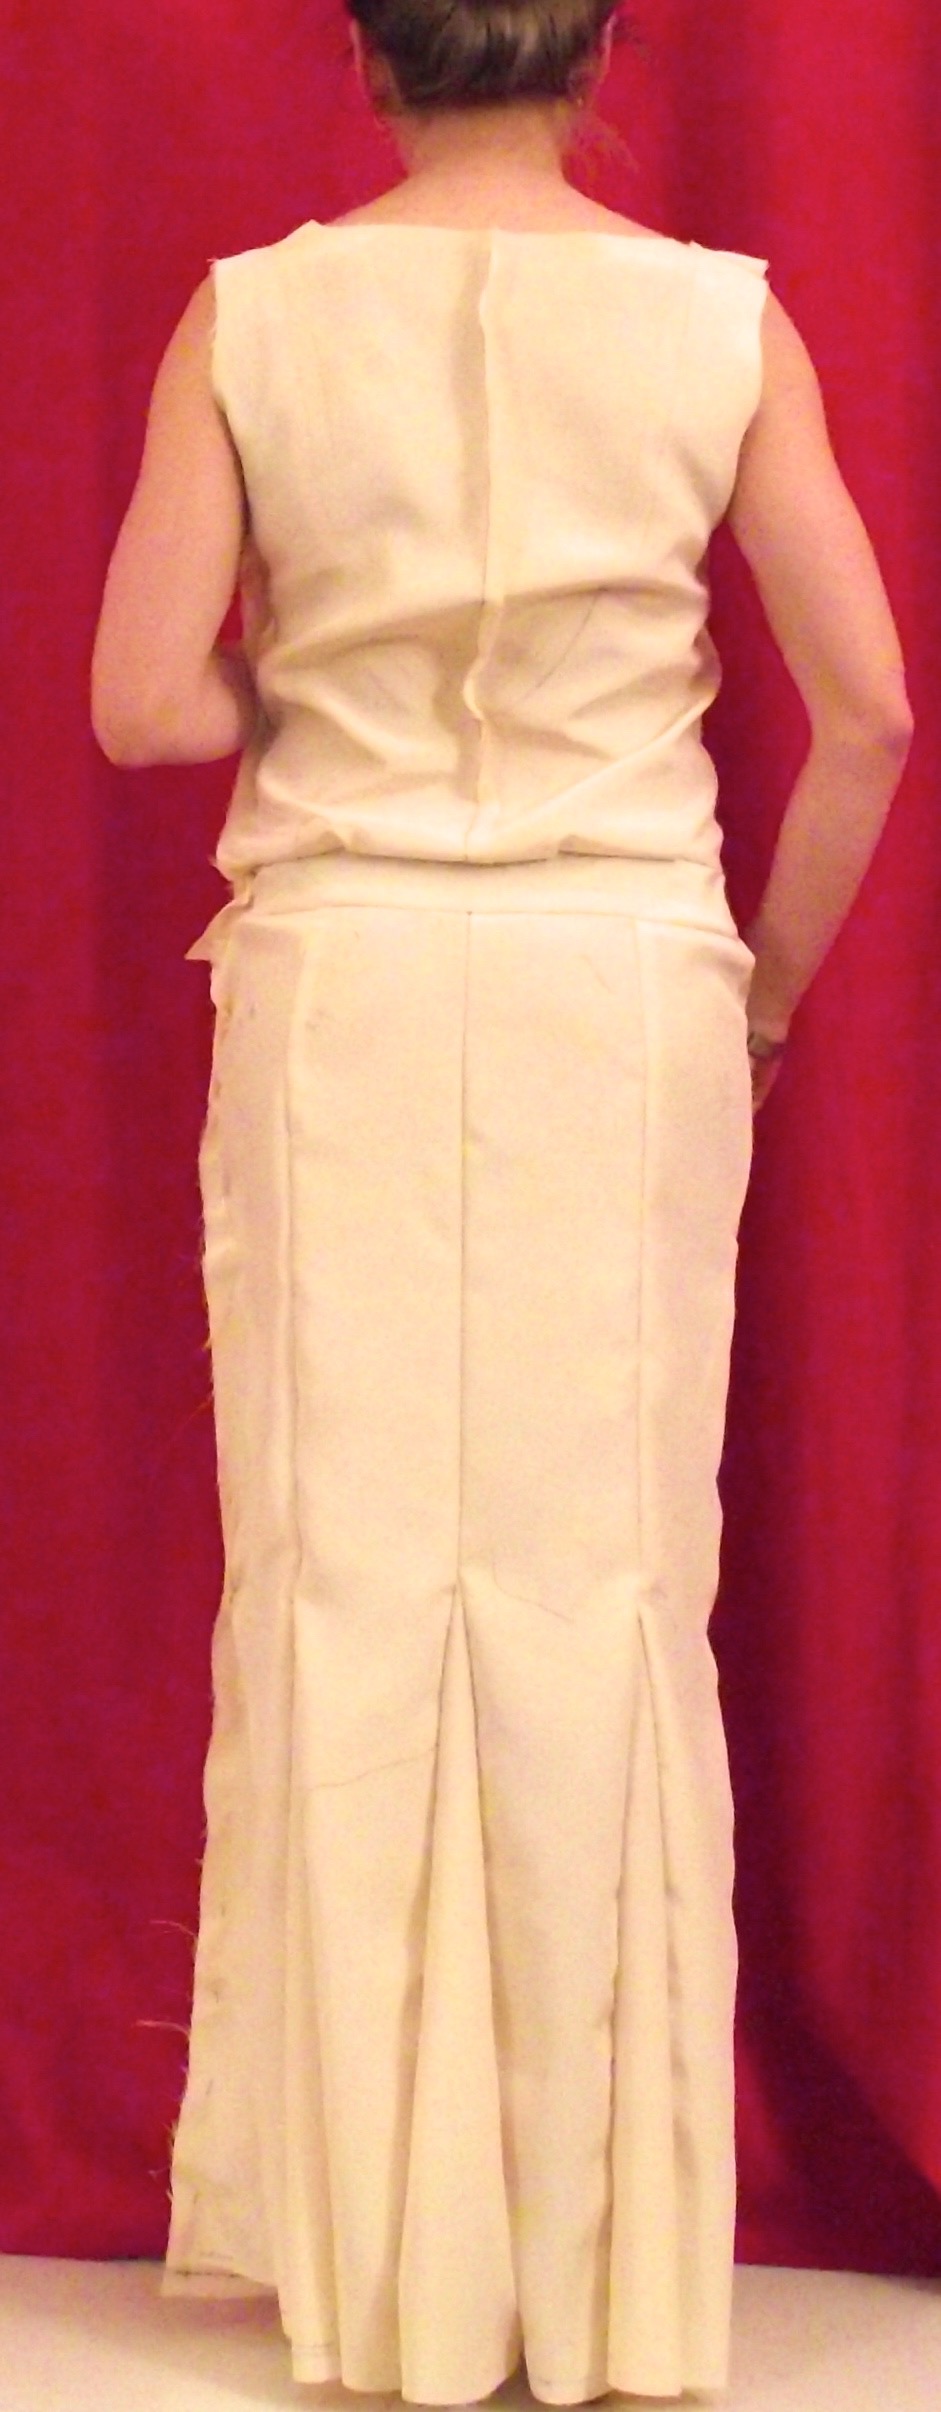


You can see there were a bunch of problems with getting the bodice to fit properly. I was so frustrated at the end of all of this that I put away the bodice block I came up with and haven’t taken it out since. 😦
Looking at all the photos, I wish I’d raised the waist band about 1.5”. I never quite achieved the blouse-y look I’d been after for the top, which means occasionally it looks like I’ve got a bit of a bigger belly (blouse-y in the lower abdomen…not entirely flattering).
I also think it would have been better for the bodice to be closer-fitting on a dress this long. Experienced sewists know this, I’m sure, but having the entire weight of the dress hang off of the tiny shoulder seams and the curved waistband is not the sturdiest of construction methods.
But anyway, it’s not so bad, and it only had to last one day.
Second, the fabric:
Actually, this was the driving force behind my decision. I was so grumpy every time I learned that a $700 dress was 100% polyester. And that’s the low end of the wedding dress business. Anyway, I ended up getting silk charmeuse from Mood for the outer and lining fabric and underlining it with crepe de chine from Fabric Mart. That worked out pretty well.
The dress was great for the weather. It was hot, I was comfortable, etc.
Third, the construction:
I really can’t recommend the Susan Khalje Couture Dress class enough. It’s pretty good value on Craftsy compared to her newer class on her own site, though I haven’t taken the second one so can’t fairly compare them otherwise. She explains both the how-to and the reasoning of different techniques very well, and the class is ordered well. I referred back to it frequently, even for simple construction order issues, when I was making this dress.
I frenched all of the seams, which worked well. They’re strong even though the fabric is quite delicate.
As an aside, I did baste the underlining to the fabric by machine. I definitely would not do that now. Hand basting is much better, and I think some of the little wrinkles around the seams could have been avoided. But you can’t know everything 10 months into your sewing.
 <— That black outline is my black silk basting threat. That beer was my fortitude.
And finally, the timeline:
What the hell was I thinking. The time stamp on that photo with the machine-basted layers is from May 23. I got married on June 14. We moved cities on June 7. To say I was cutting it close is a massive understatement. It worked out in the end, but it also drove me a bit mental. I’d say if you haven’t started the construction phase of your final garment six weeks out, you should just make a trip to J.Crew’s bridal section and then take the dress to your local tailor for hemming.
I made mine and I STILL ended up taking it to a tailor to have it hemmed. That tailor actually said: But WHY would you do this yourself, we could have made it for you.
Truth.
But also: I made it. 🙂

What a cool thing and it came out beautifully! Also, what a great story – way more interesting than not doing it yourself. Yay!
This is awesome! I just discovered your blog. I’m really impressed by people who make their own wedding dresses…and that you were new to this to boot!!
Thanks so much!! It’s funny, with another year of seeing under my belt, I think I’d be more hesitant to embark on wedding dress sewing now than I was then. Beginner overconfidence I think!
I had the same thing 🙂
I have to respond to your opening paragraphs about choosing to draft your on pattern – yes maybe you bit off a little more than you could chew, BUT- I am a BIG Fan of learning by doing and I think you absolutlely did the right thing. Your dress looks beautiful and the lessons learned will serve you well for the rest of your sewing journey. Well done!
I definitely did learn, it’s true. And the bodice draft I’ve used for a few things. My problem was that I just tried to do too much all around and didn’t leave myself quite enough time, given my experience level. But the learning aspect was good, and I wouldn’t likely be brave enough to try it today. So! The biggest takeaway might be that you have to be aggressive about managing the timeline for that kind of project if you’re going to try self drafting.