Or, more accurately, I need to talk about my shoulders. To myself. Because this. 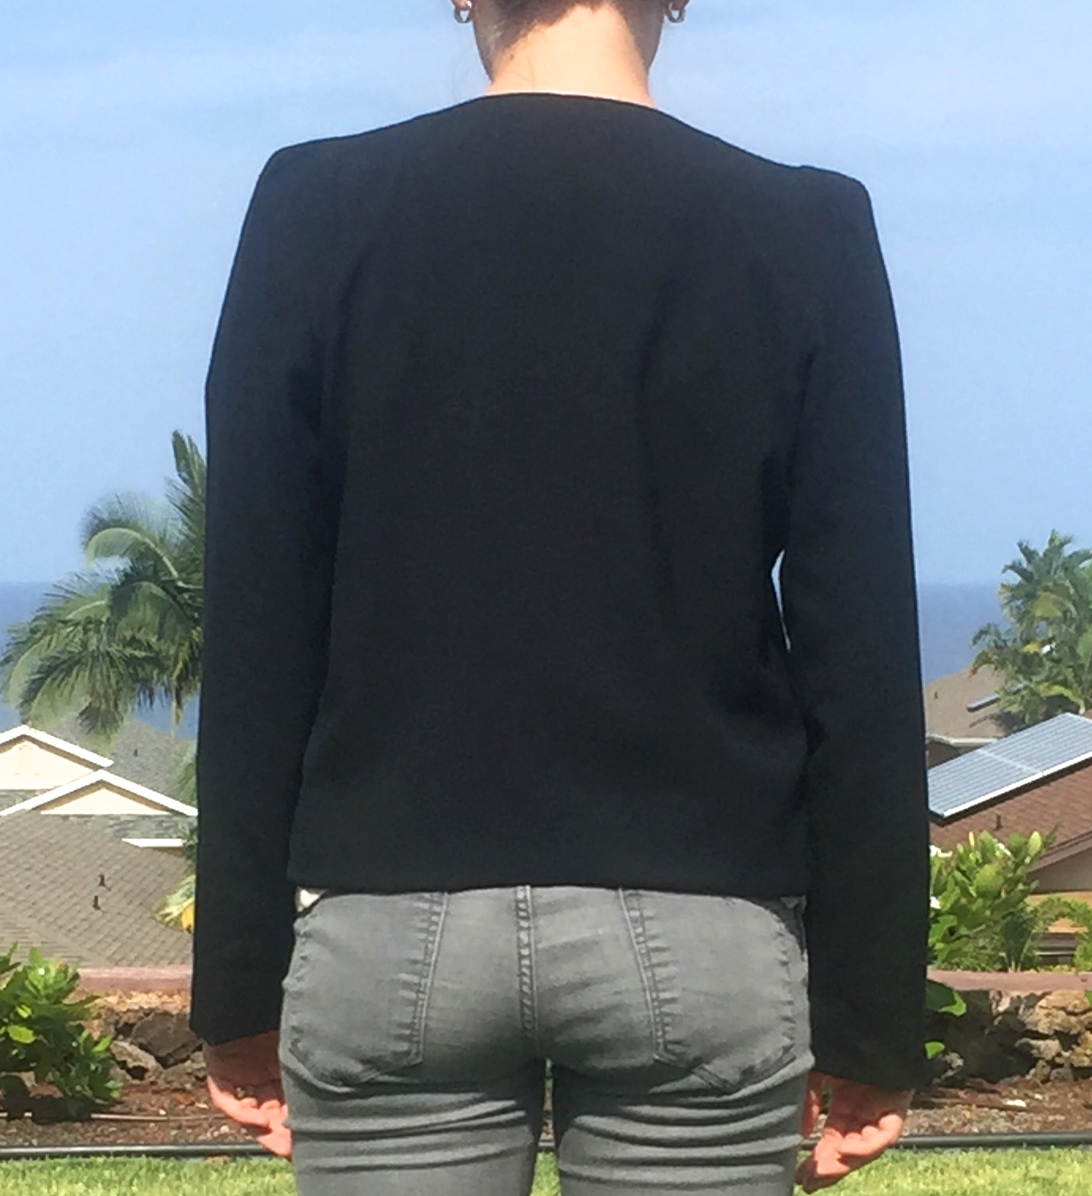 But look, this was my second go at a blazer (the first I never blogged), and this StyleArc pattern is actually pretty simple to put together. Some pictures, change in background courtesy Hawaii and Momma and Poppa Wasted for making that happen.
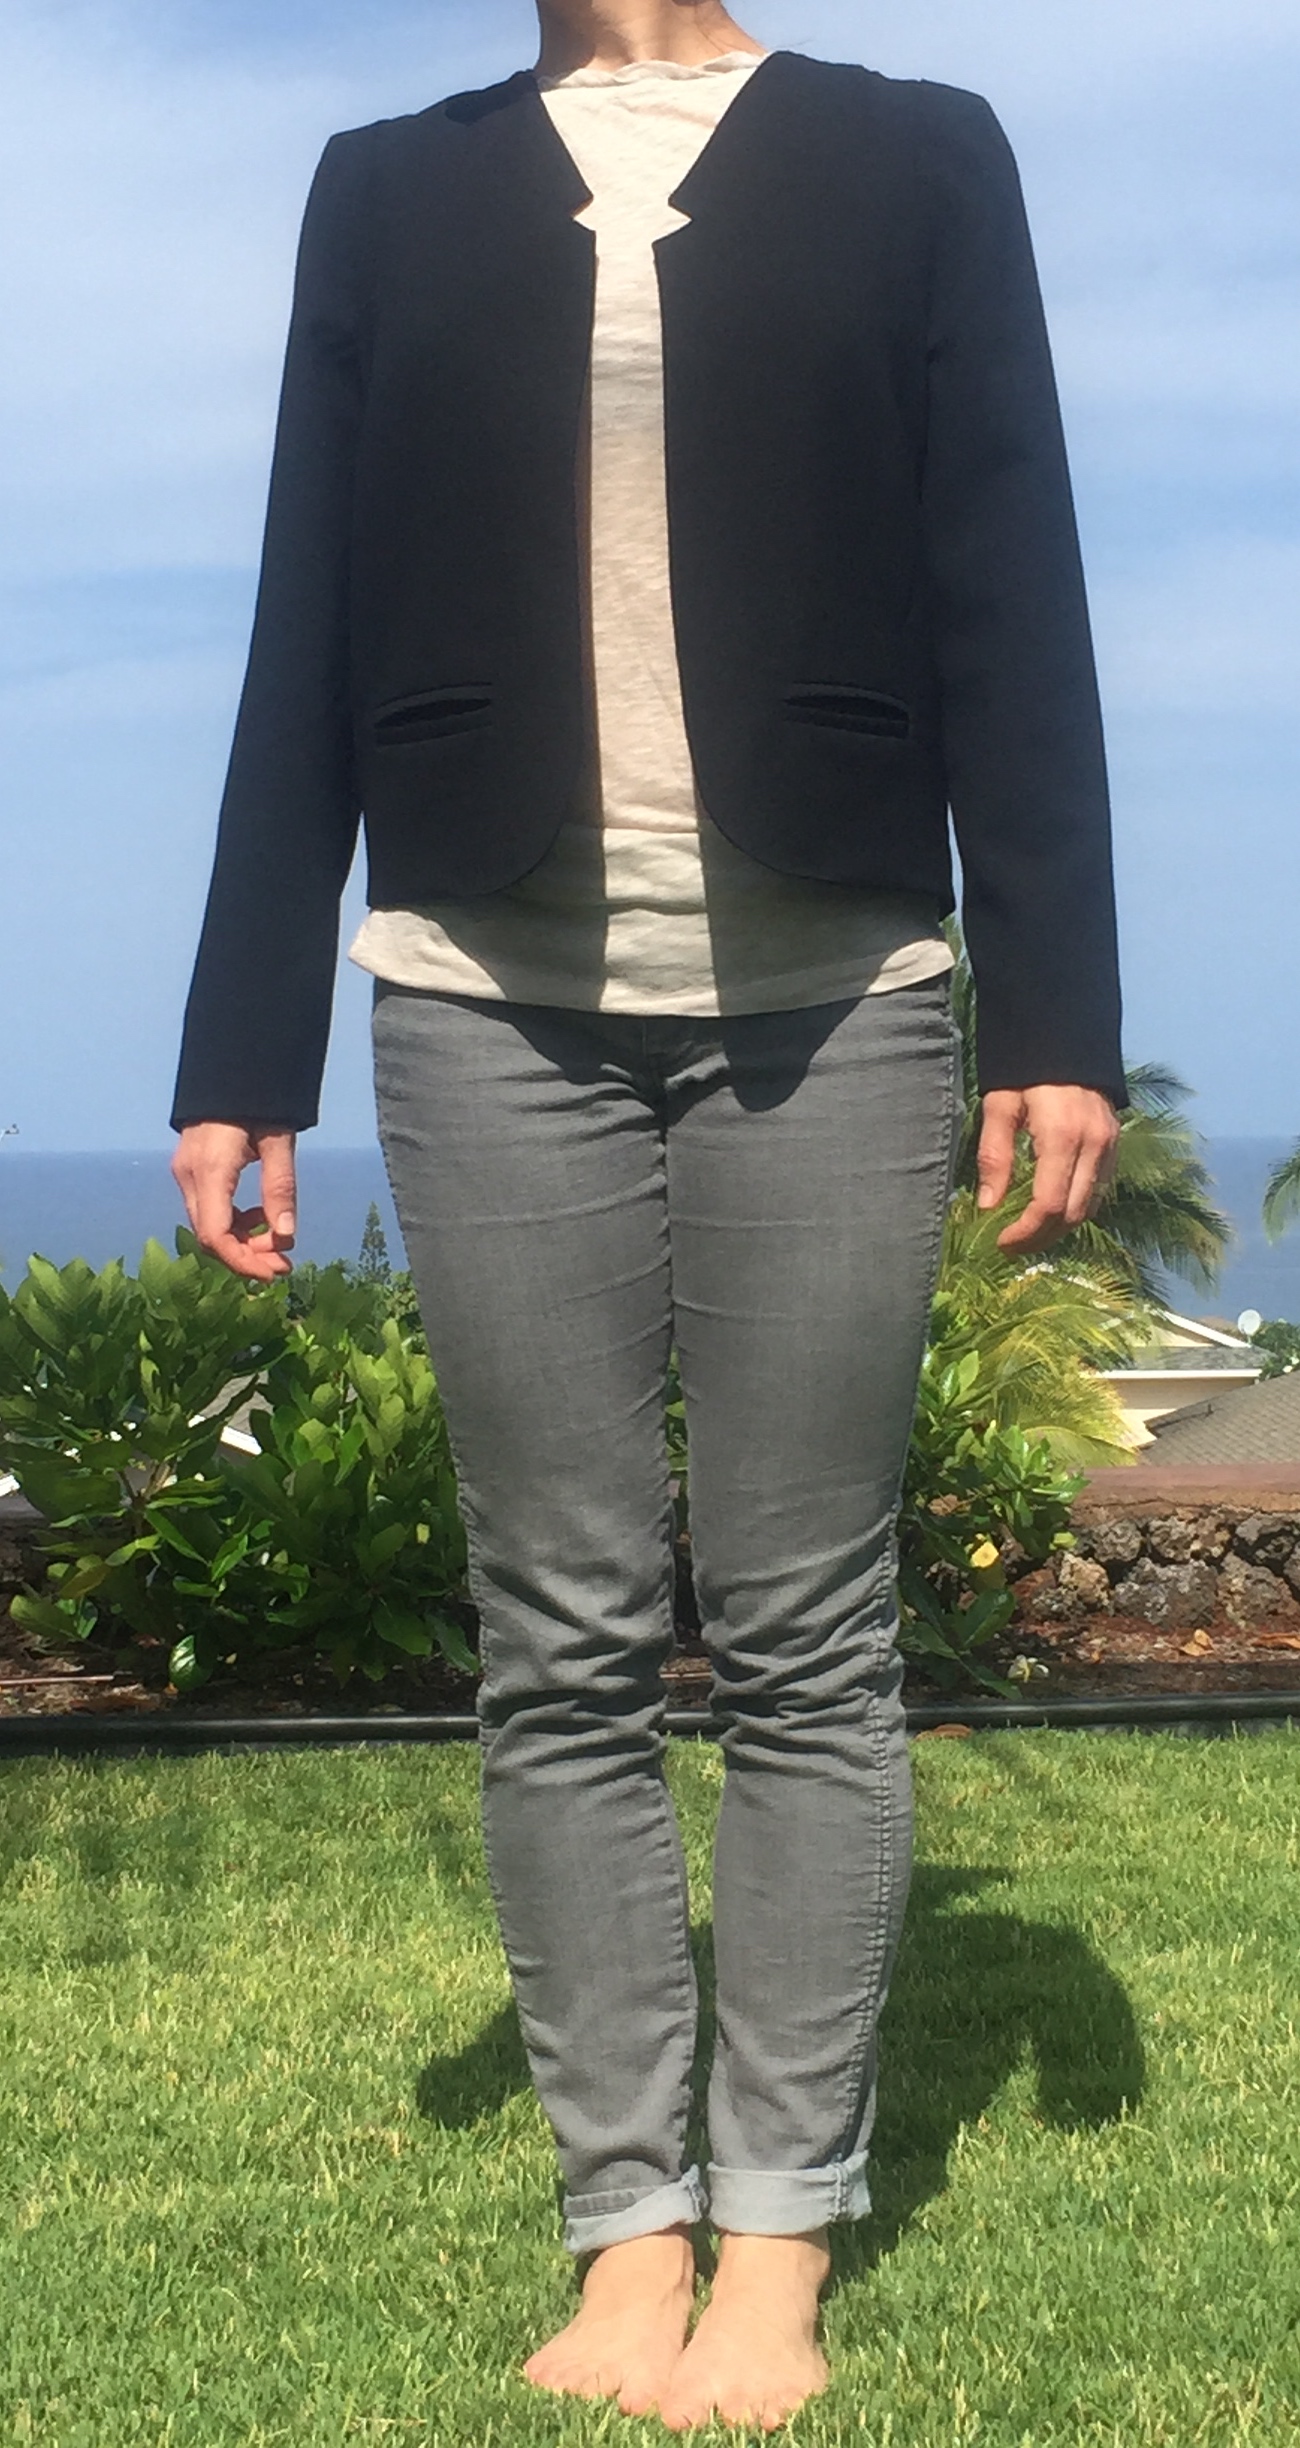
 Now, to shoulders- and back-fitting issues. My shoulders, in my head, are broad and muscle-y. So is my back. (I don’t know, in my head I think I look like this?) Buttttt several projects (this one being the worst) and this Threads article tell me I need a narrow back, narrow shoulder adjustment, or erect posture adjustment. Unfortunately for me and this jacket, I hadn’t come to that realization until the outer jacket was constructed and one sleeve was set in. Since it has some bearing on the shoulder issues, let’s talk about the Gabby jacket pattern a minute. The jacket pattern is super simple, and it’s a little boxy. It has an interesting shoulder treatment (a bit thriller-y but whatever), and a ‘reverse revere’ collar. StyleArc says it will look like this.
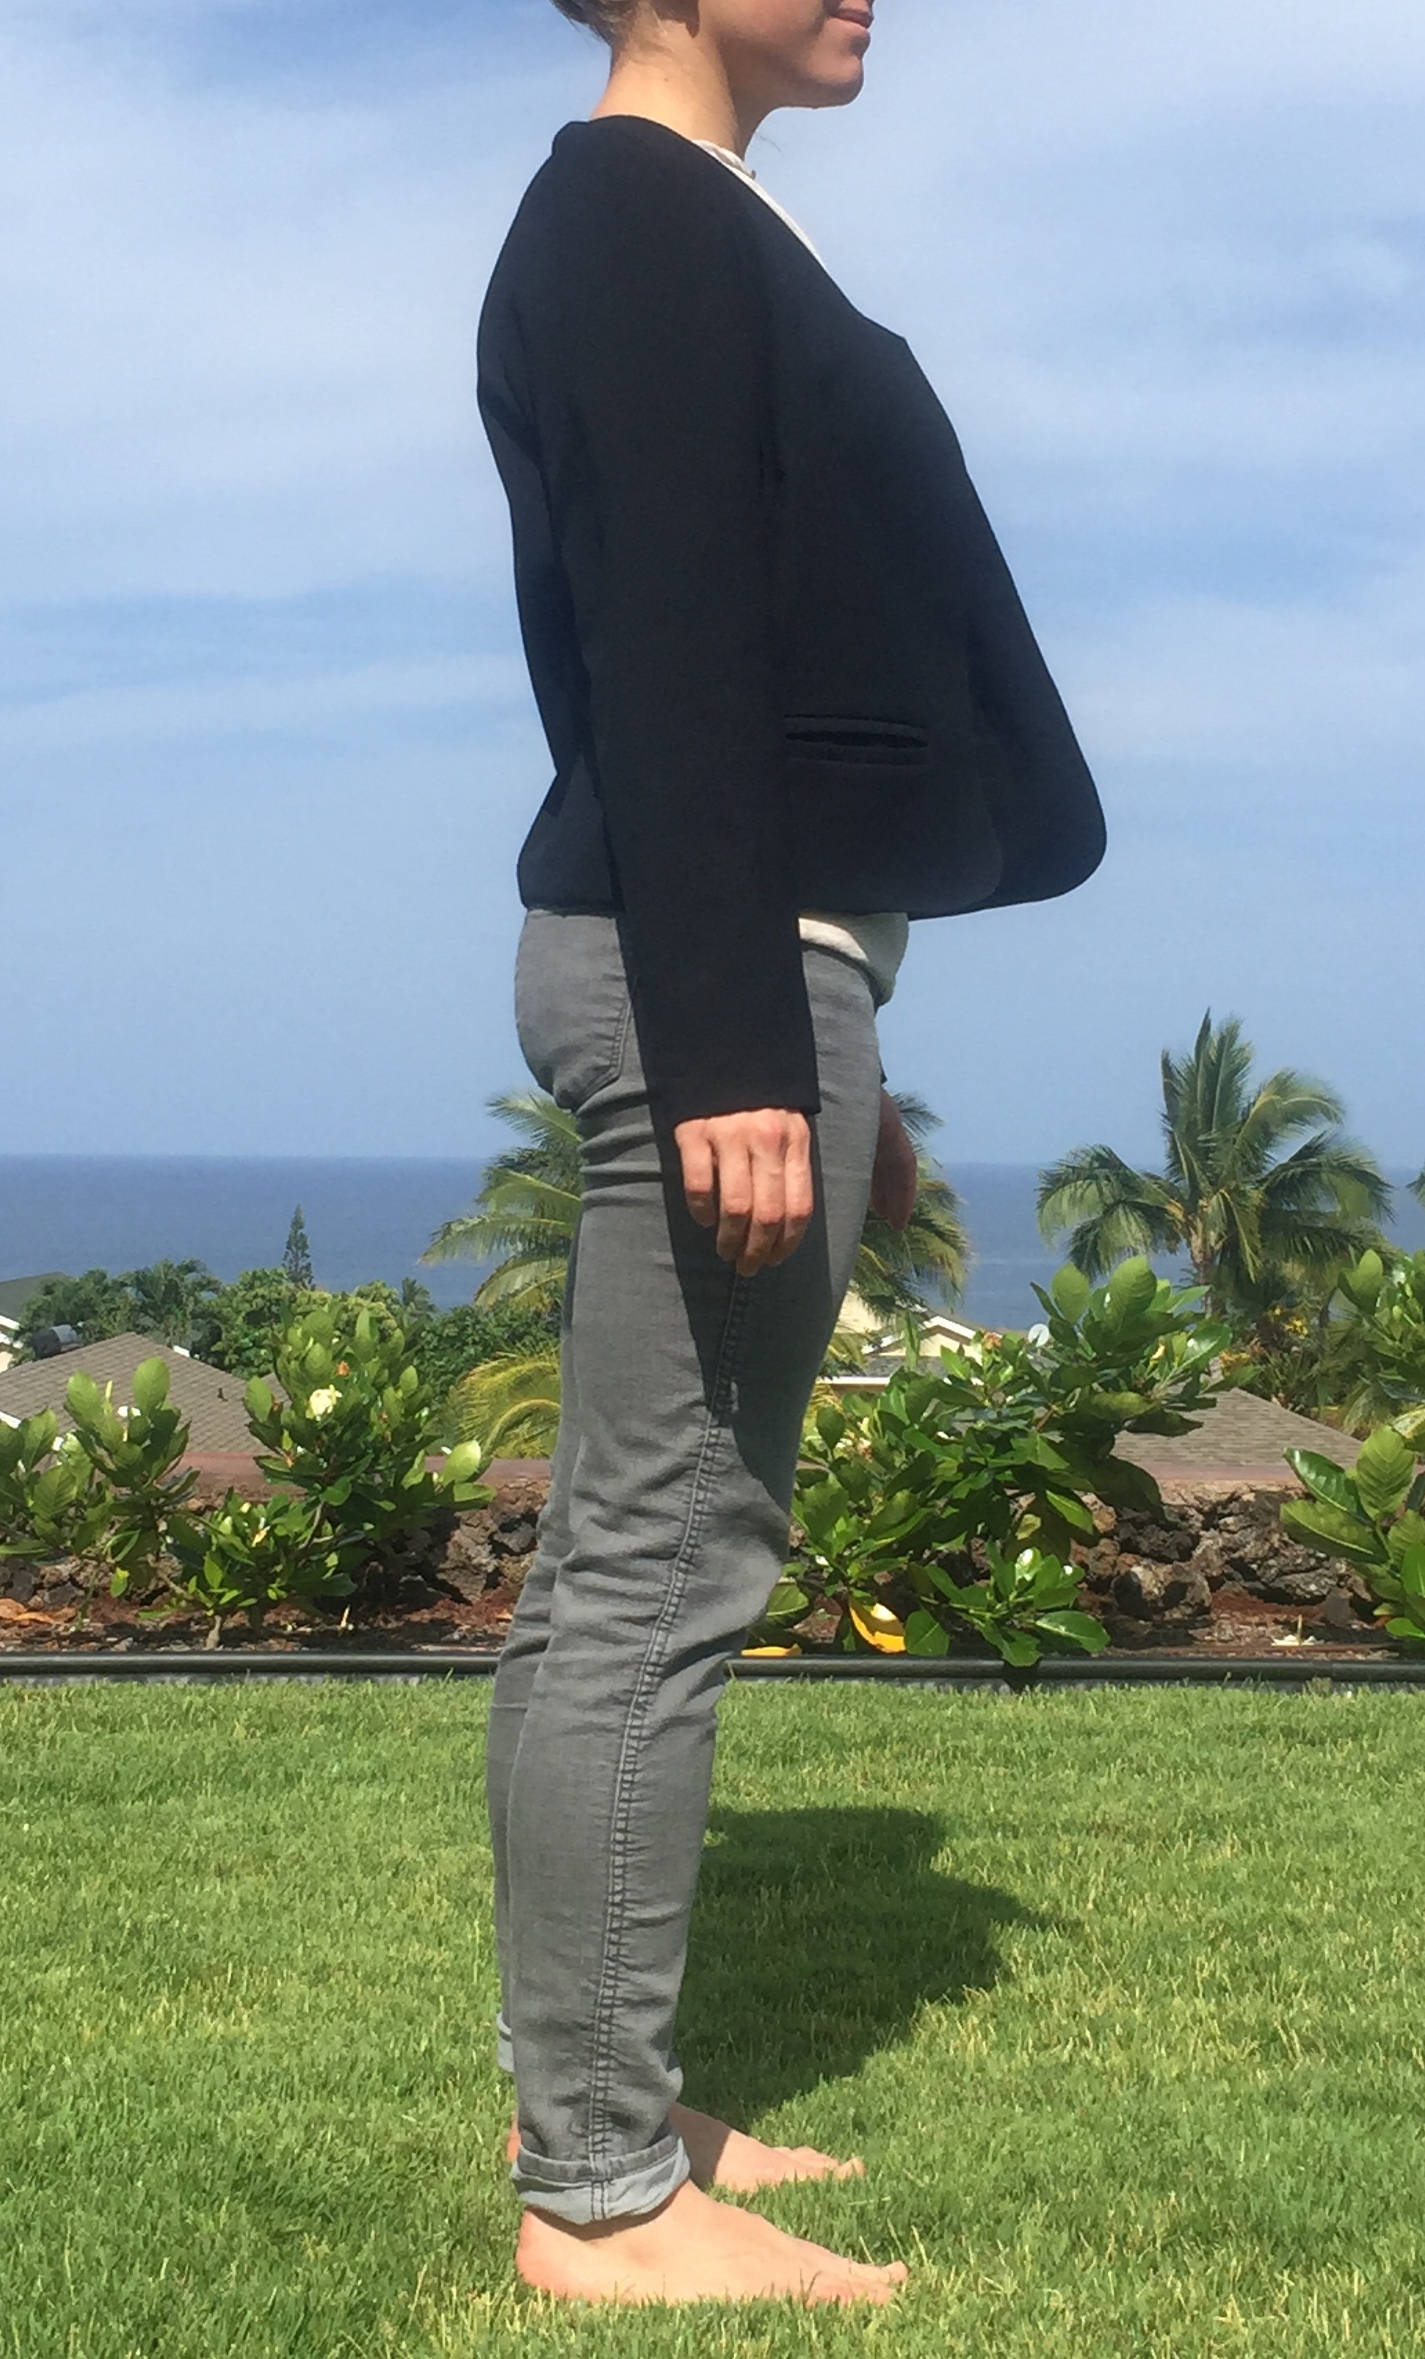
 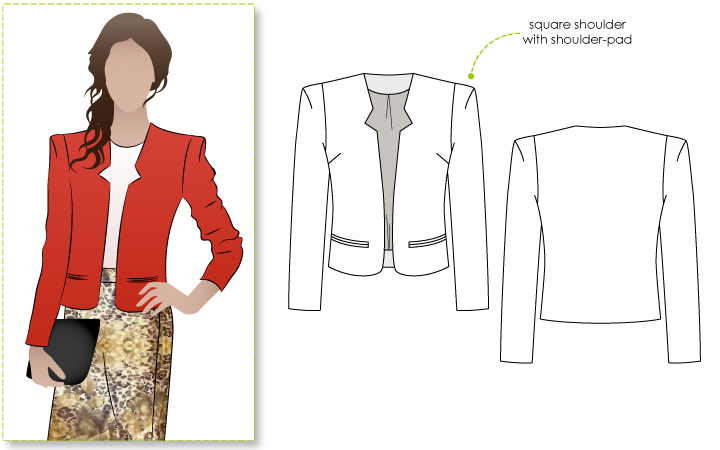 On fitting: This is the first StyleArc pattern I’ve made, so I had no fitting point of reference. Because I am lazy, I didn’t make a muslin to check the fit. My shoulder breadth, waist, and hips are all safely around a size 10, which is what I bought. I could use a full bust adjustment, which I didn’t do (lazy.). Without one, the front pieces don’t really lie flat on my body, which is mostly visible from the side.
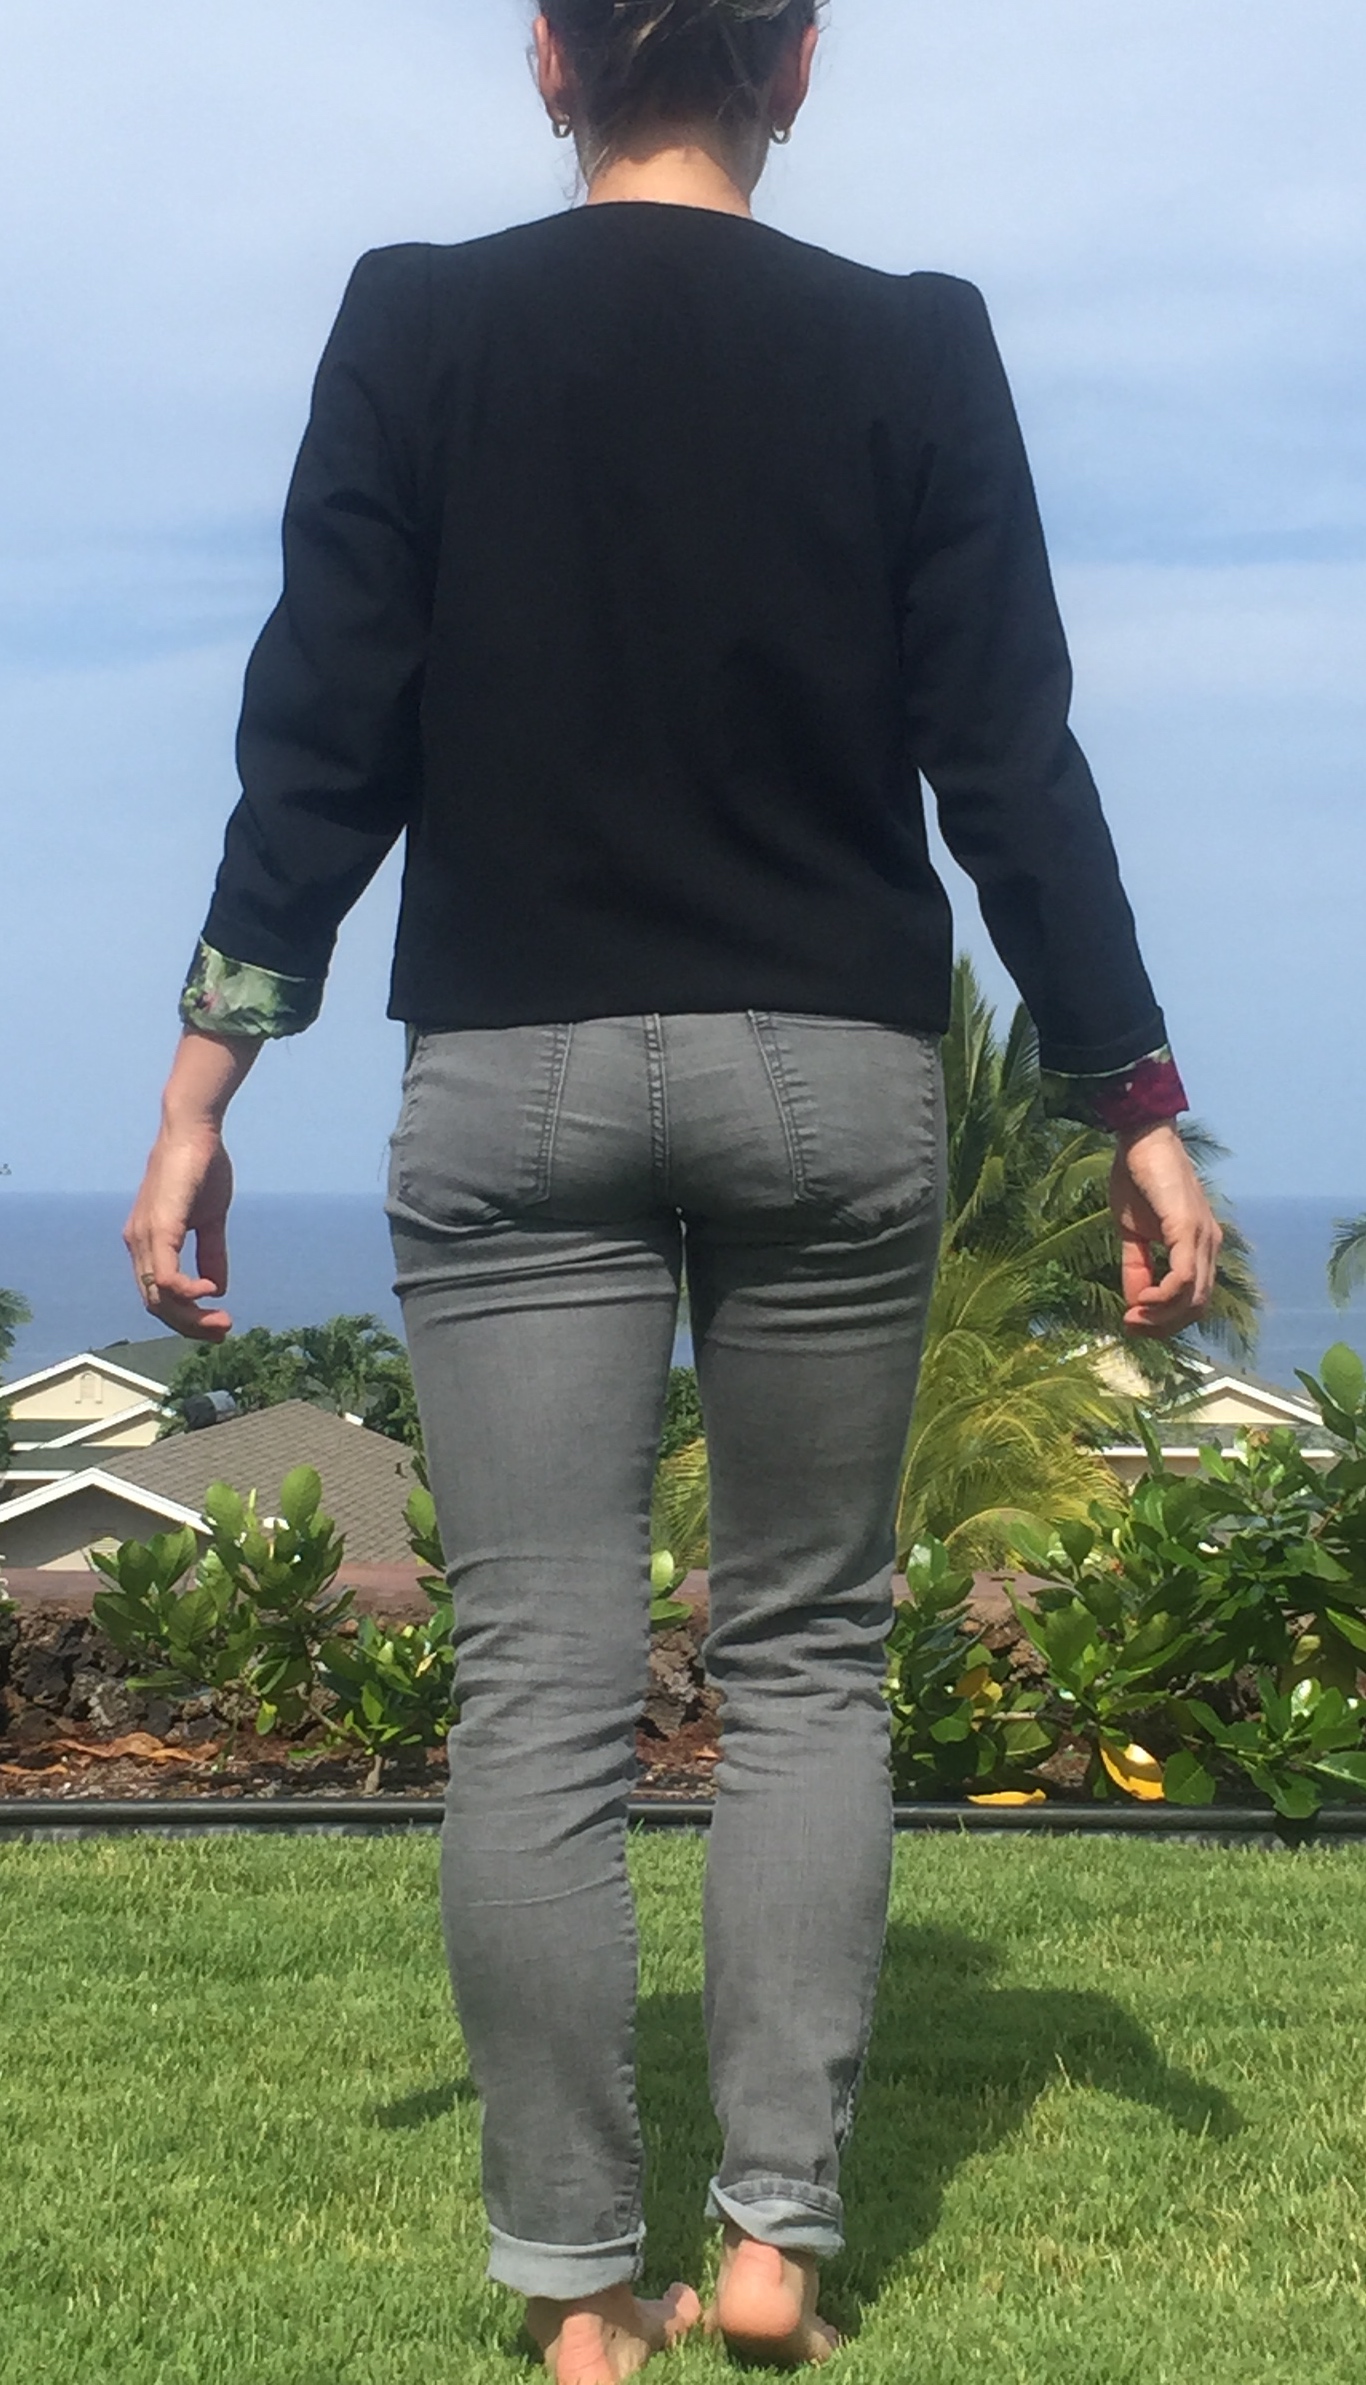
 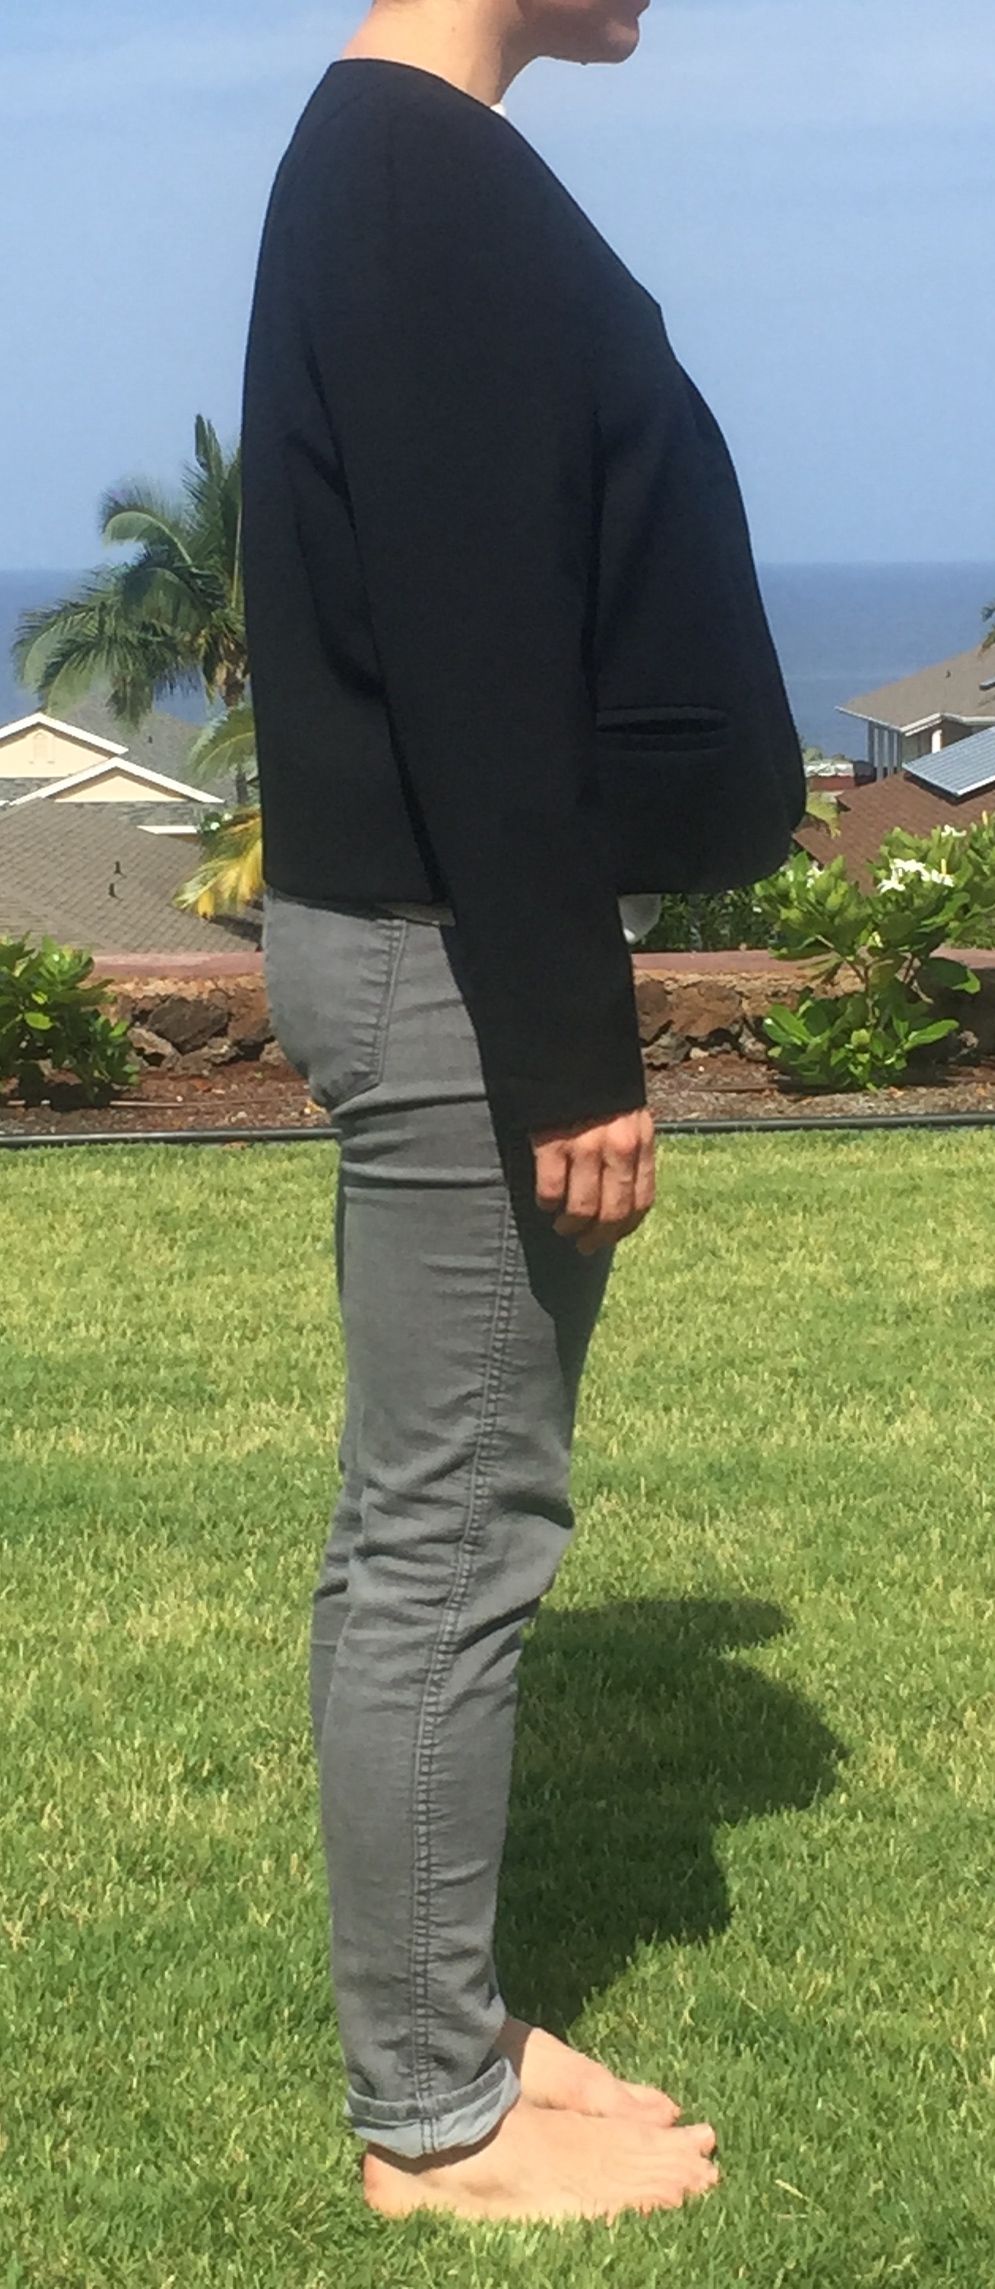 Bizarrely, my bicep measurement comes in at a size 4 (see above for how I envision my arms), which helps explain why the sleeves feel and look pretty baggy. In order to slim the back down, I ripped up the shoulder seam and added a 1/2″ dart to the back shoulder that extends 7″ down the length of the back piece — the right-most line in the picture below. I then eased in the front piece without removing any length. This isn’t a perfect solution, but it kept the jacket from the trash.
 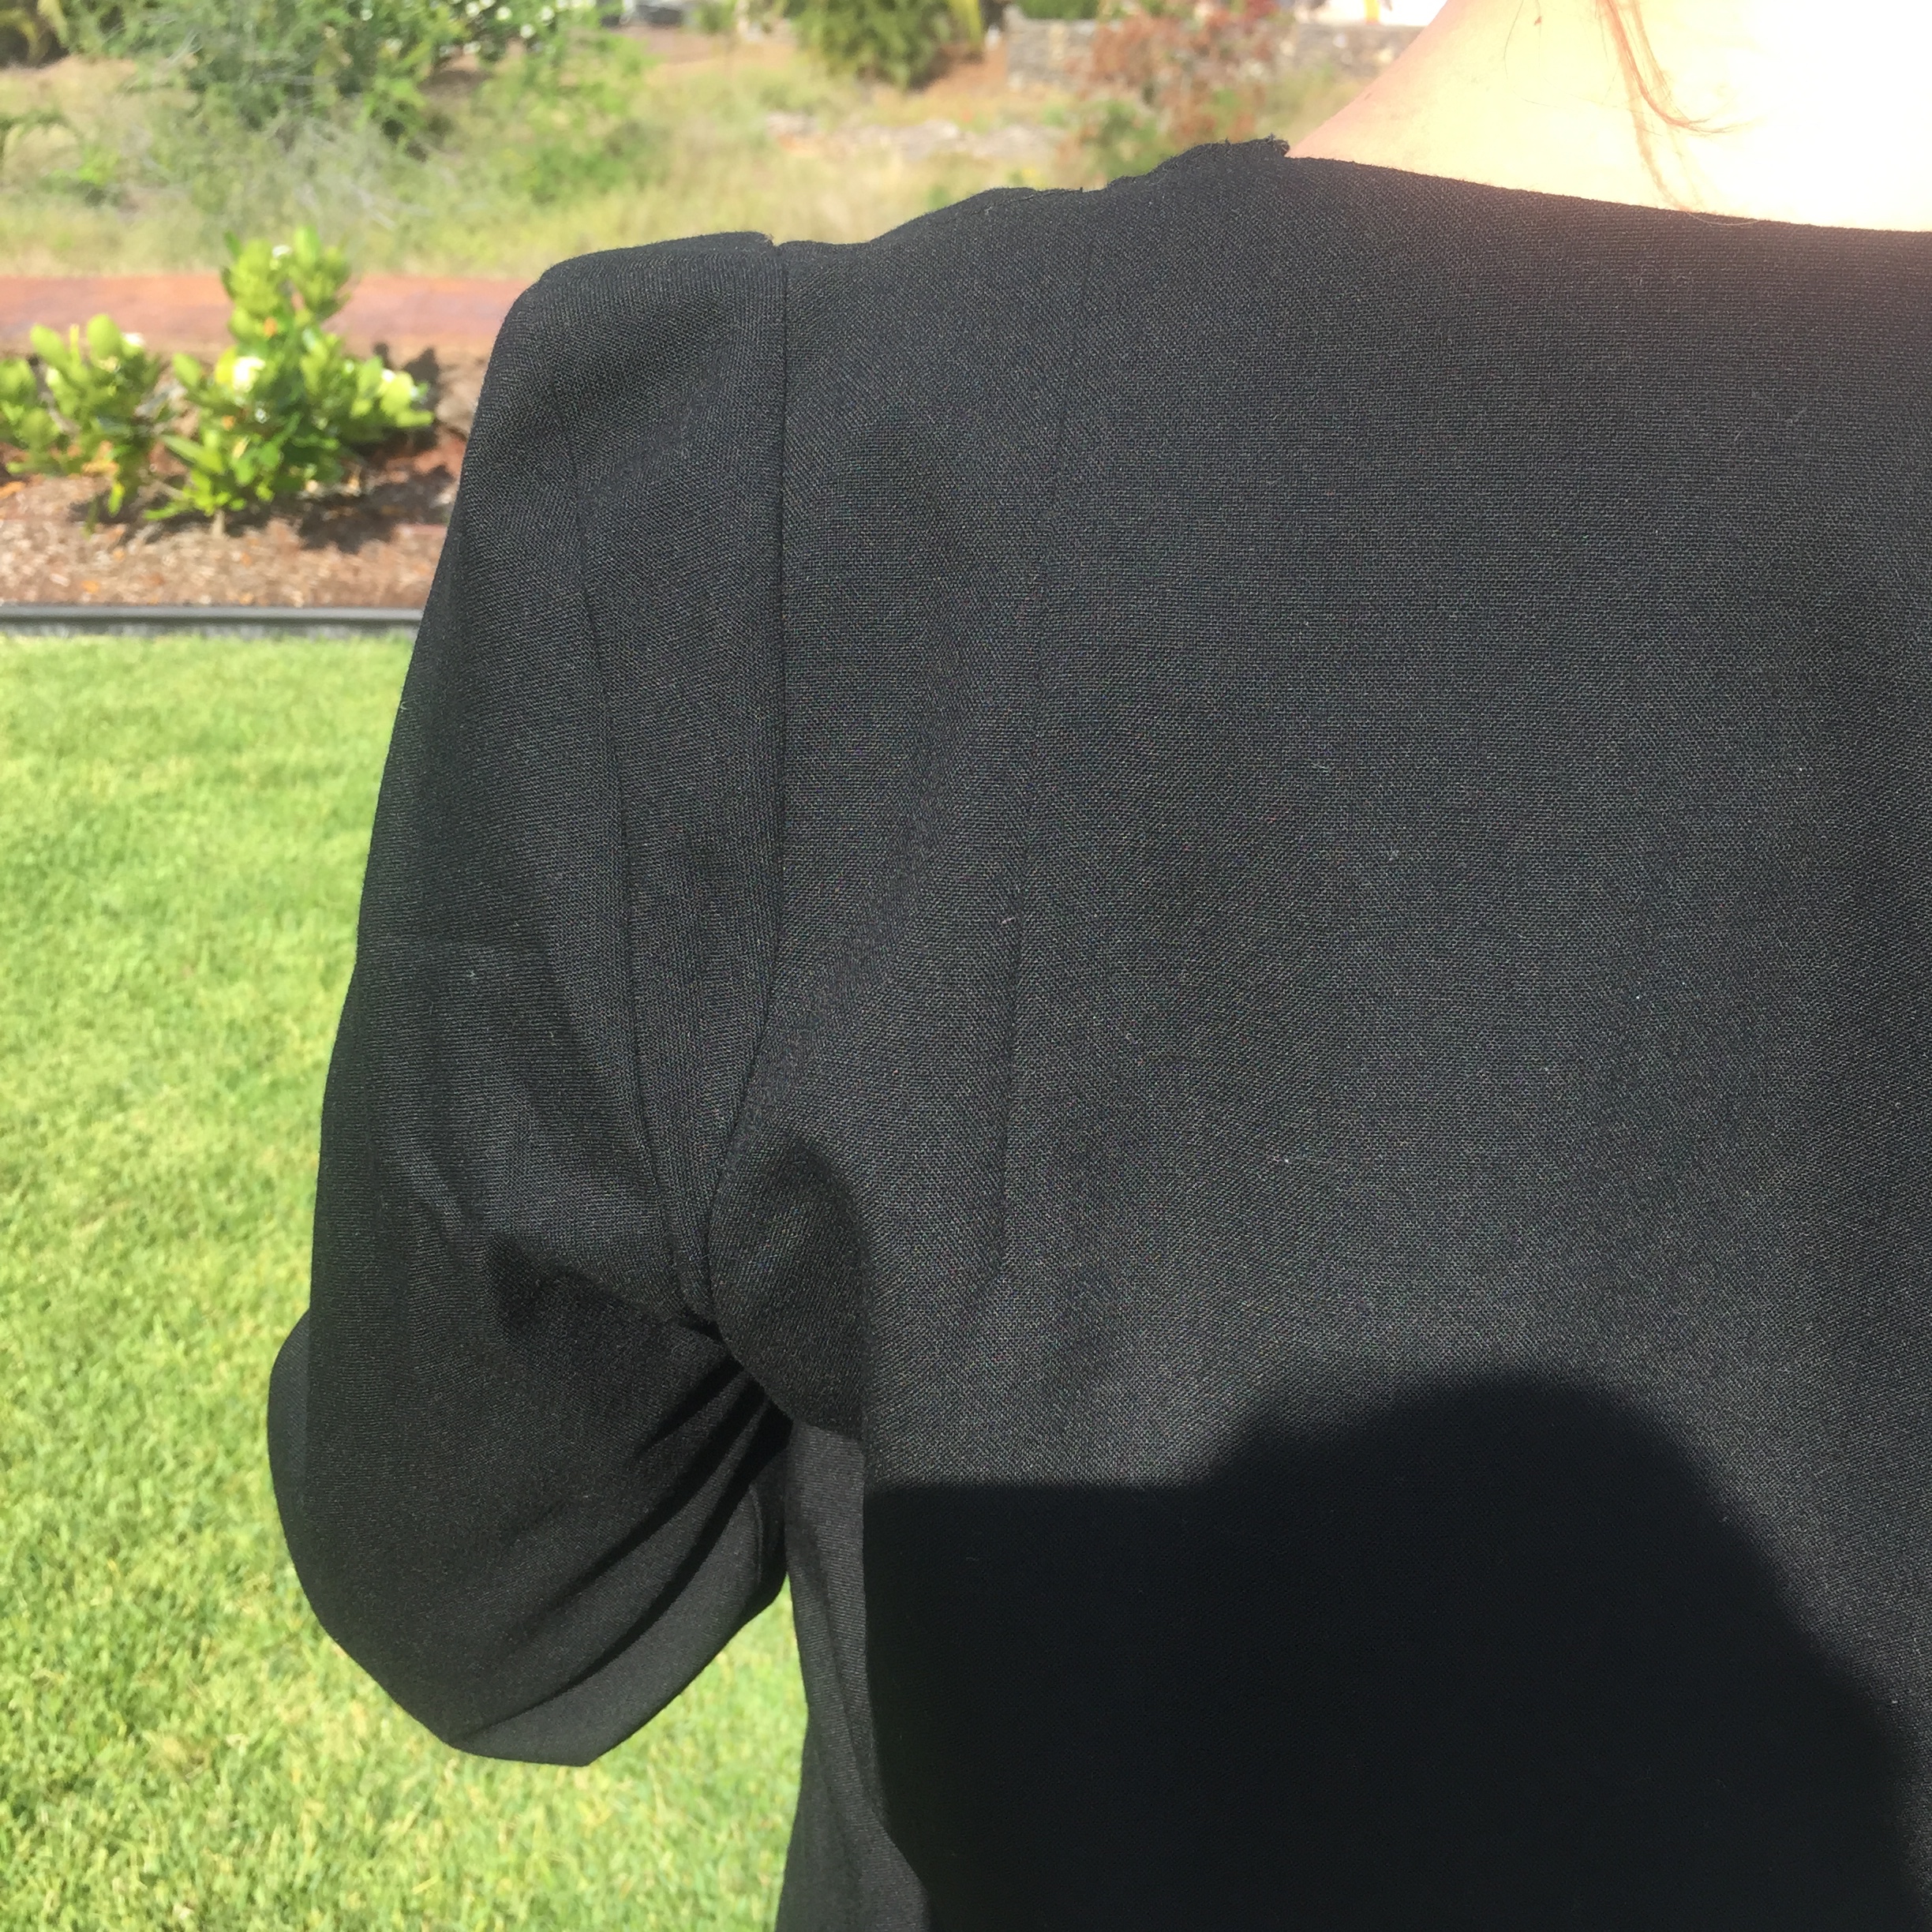 That collar: There is no attached collar; the notch is just part of the front and front facing pieces. I think that notch sits a little lower than the line drawing suggests, and if I make this jacket again, I’d slide it up an inch or two. Those shoulders! I hadn’t seen this sleeve treatment, and the sleeve pattern piece looks a little bonkers. Something like this:
 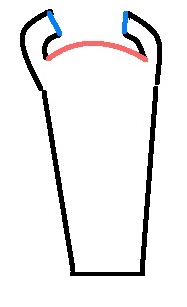 To construct the sleeve, you join the two blue lines together, and then sew the newly-created black arc of sleeve cap to the pink arc at the top of the sleeve. That gives you the very jutted-out sleeve head. The pattern piece has a point that tells you where to end this sleeve cap dart. But I had so much extra fabric at my back shoulder that I continued the dart all the way to where the shoulder sets into the armscye. In the below photo, the left-most vertical seam line that’s visible is the sleeve cap ‘dart’. The armscye is the middle vertical line. Construction and instructions: StyleArc’s reputation for middling instructions is well-documented, so I had fully briefed myself on basic jacket construction prior to beginning the assembly. The written instructions for assembling the outer jacket are okay. But then the lining instructions say something like, ‘assemble the lining in the same manner as the jacket.’ Which, okay, except what about facings? There are jacket front facings, a hem facing and a back neck facing. At one point it tells you to sew the front facings on to the jacket fronts on their own, but then what about assembling the lining as you did the jacket?
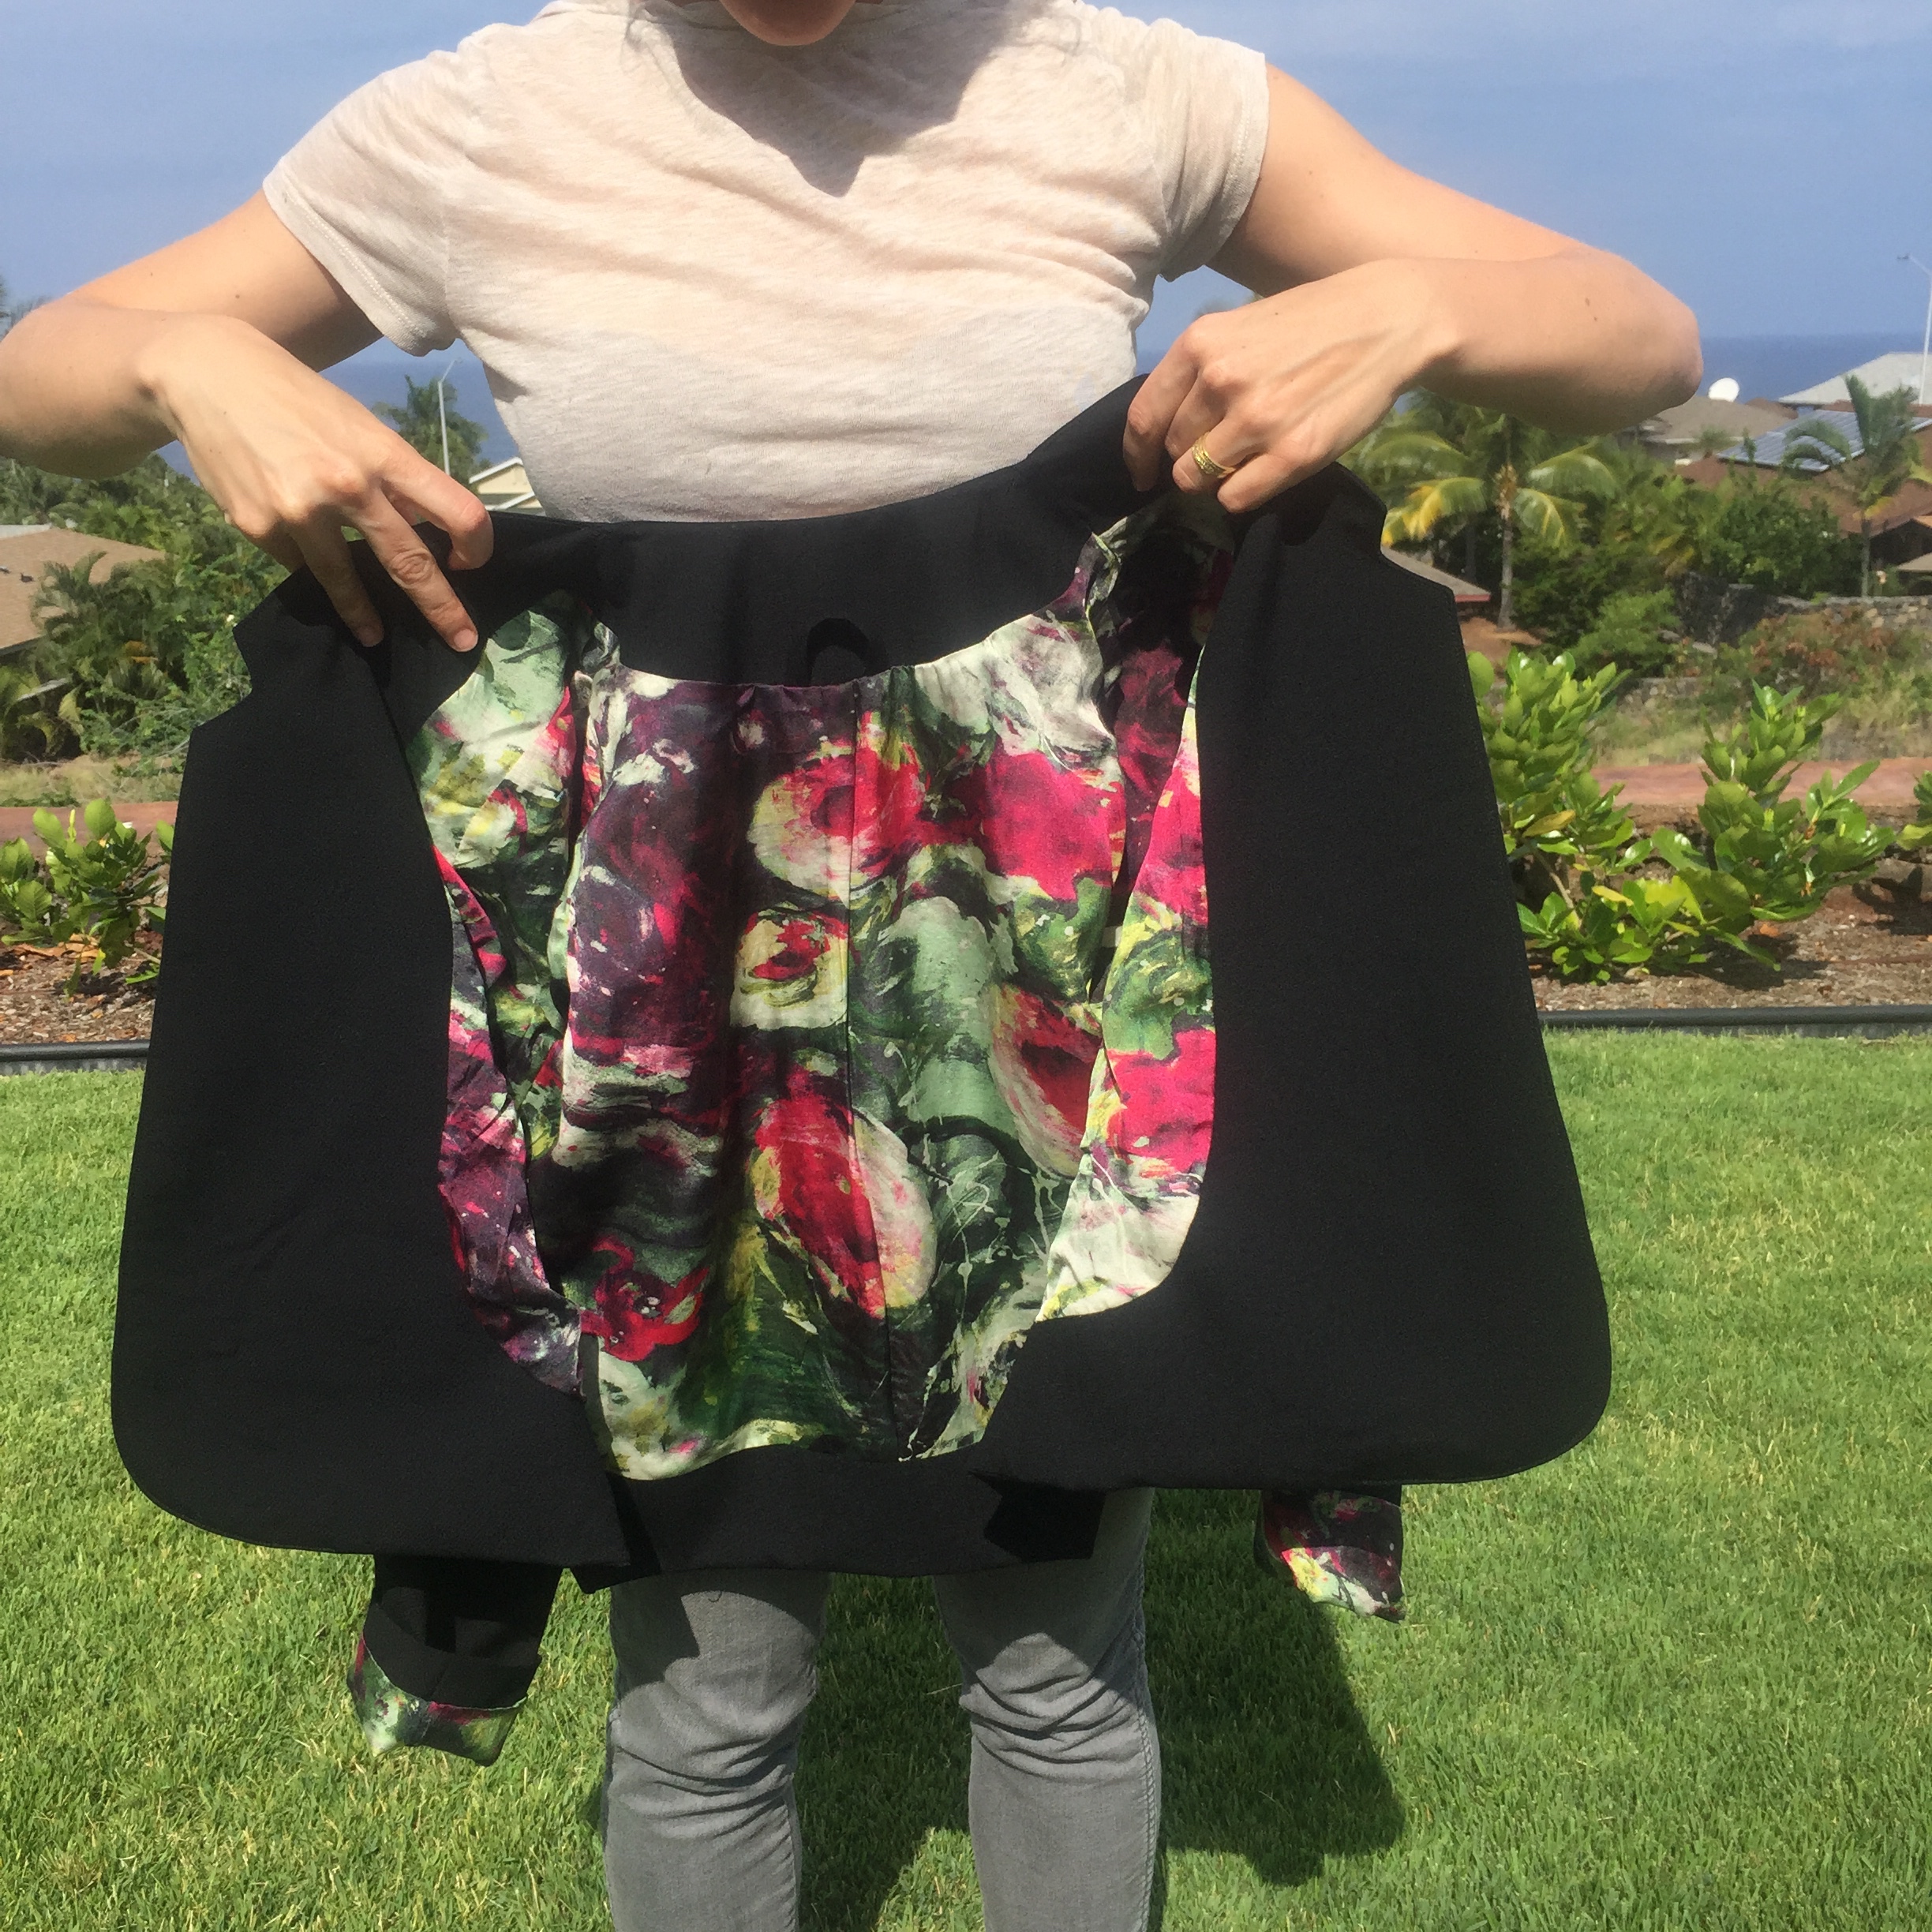
Whatever, I just assembled all jacket innards as a second jacket, and then essentially followed this process. I did follow StyleArc’s directive to top-stitch along the jacket front seam line once the facing is installed, and I regret that decision. The extra line of stitching makes it quite stiff and probably contributes to the front pieces not lying flat. I also followed the instructions and interfaced both the jacket front and front facing using a very light weight fusible, but perhaps that stiffened it a bit as well? Overall, though, I’d prefer to have specifically-drafted lining, facing and shell pattern pieces rather than one piece with a ‘cut here for lining’ line. Last, but not least, fabric. I used a black wool crepe from FabricMart for the jacket body. That site is basically the only place I buy fabric now that I don’t go to New York for work (where I could leave half an hour before my train and run over to Mood). Washington DC is a complete fabric store desert. The lining, also from FabricMart, was listed as a ‘cotton silk charmeuse’. It is awesome. It’s very lightweight and has a smooth side to serve its purpose as lining. But the cotton in the fabric makes it much, much easier to work with than plain old silk charmeuse. Highly recommend that blend and am searching for more similar stuff myself. 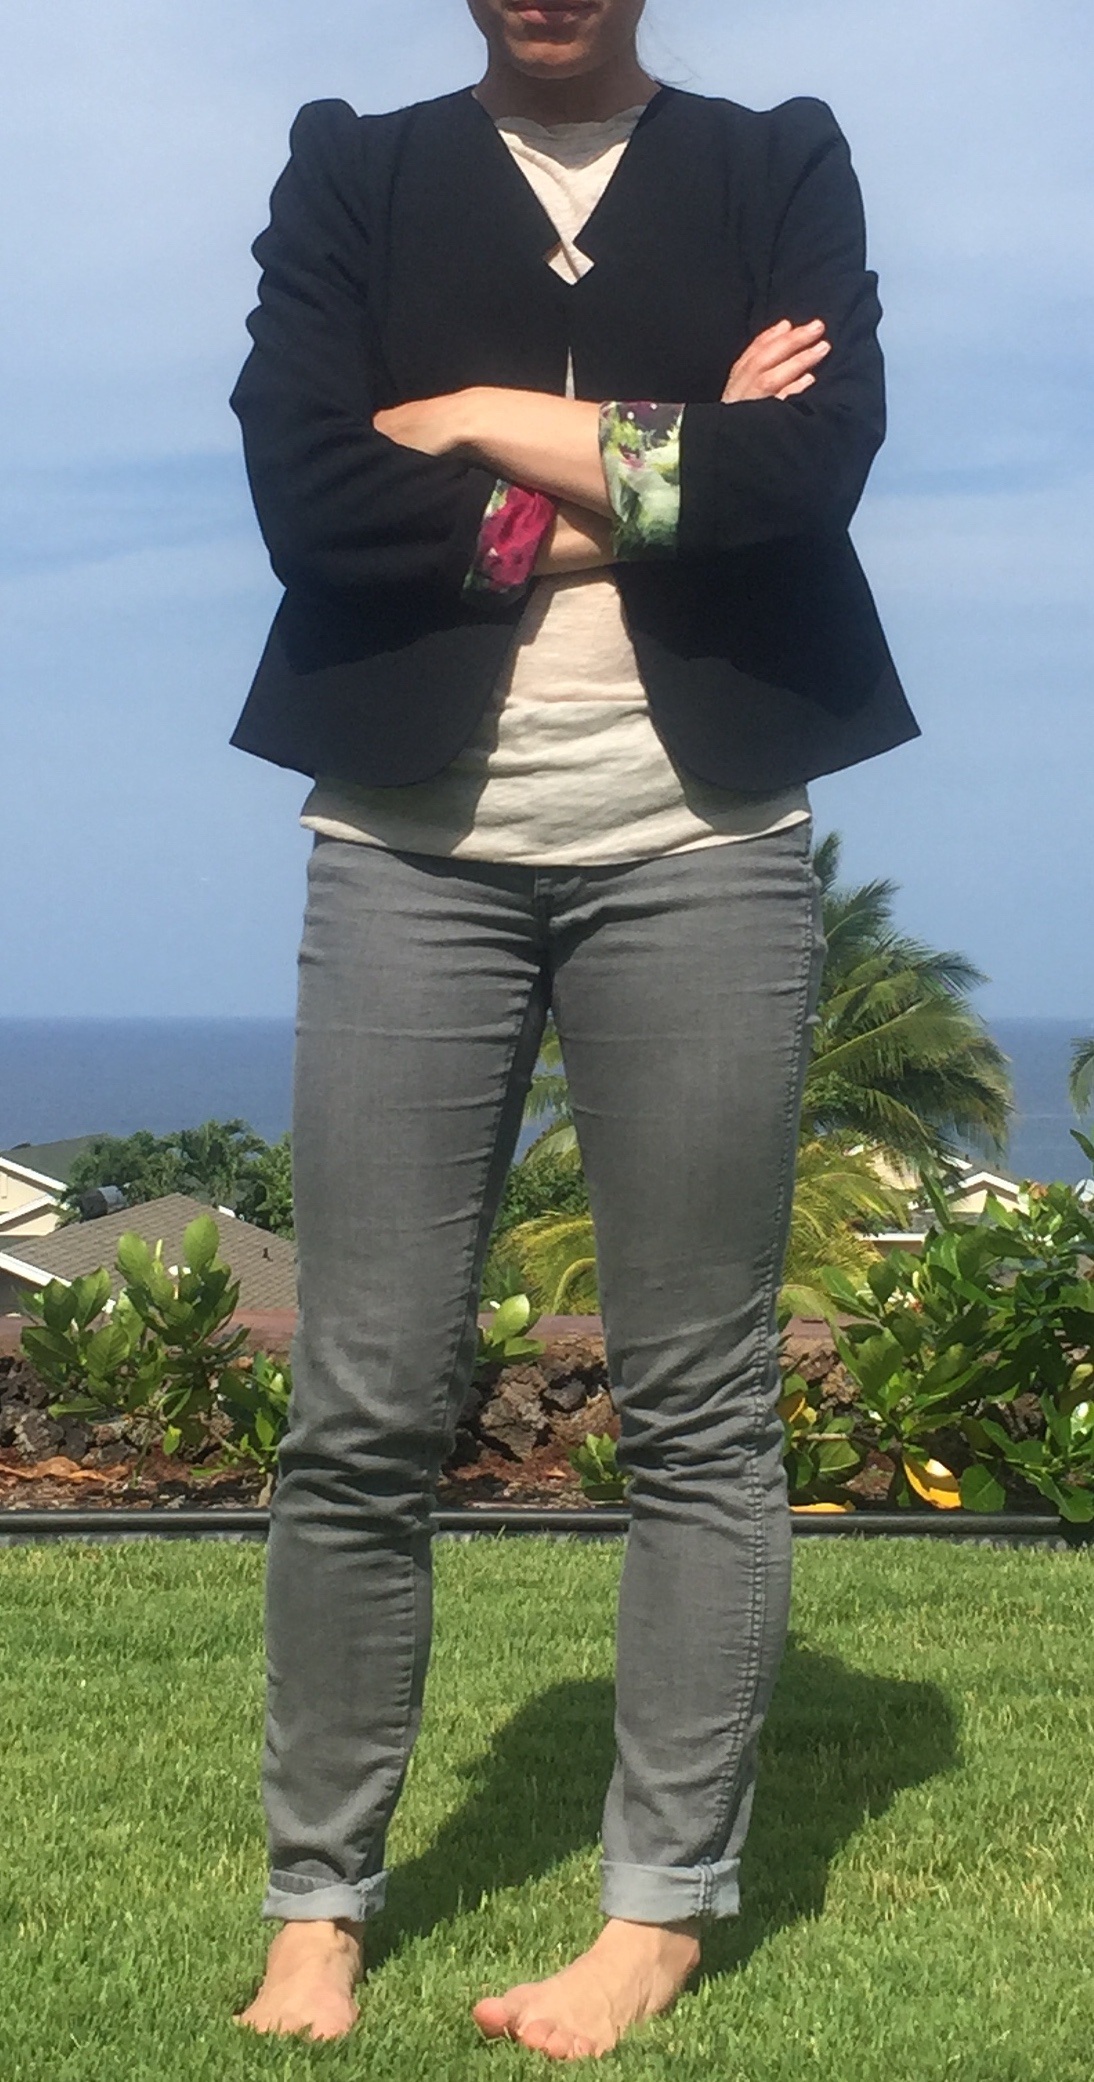 Anyway: a jacket! I made it! Etc.

I’m impressed! I also love that colorful lining. I don’t know why it never occurred to me to use anything but fabric labeled “lining fabric” or plain muslin for a lining. I’m changing that immediately!
Oh yes! I am partial to silk charmeuse and silk crepe works well for dresses but not really for anything you want to slip over another garment. But I’m totally indiscriminate on the color or pattern for lining (so long as it won’t show through the body of the garment). So I typically just buy stuff that’s on sale because it’s a bit of a gross color or pattern — though in this case I got lucky and it was neither. I find natural fiber fabrics are also a little more stable than others. I once tried Bemberg-rayon-official-lining fabric and it distorted every time I looked at it. Trashed that lining and recut in silk crepe.
Thank you so much ! Your review is fabulous, I would be lost trying to figure out those sleeves and lining on my own. I also love your colourful lining ,I have basic black for this project but will branch out next time. Cheers, Karen R
Oh good! Let me know how it goes, I’d love to see another one.
The collar is different, nice! I have a Retro dress pattern (1950’s?) that has the same collar. The shoulders remind me of the 80’s. I guess everything old is new again! Very nice!
Thanks!! The shoulders are a little 80s it’s true! I haven’t put in shoulder pads yet and was worried about doing it and making them too 80s but maybe the shoulders need them.
I think they look cute as is!
You might also have shoulders that slope a bit more than the pattern was drafted for. This is a problem that doesn’t show up in the front so much as the back, where the garment collapses around the bottom of the armhole. You might try the fix for this to see if it helps (although I agree the back looks too wide also). To try it, sew the shoulder seam as indicated, then pin out a deeper angle on the seam and see if some of the back wrinkles disappear. It won’t affect the front of the garment. Don’t make the whole seam wider–that will just raise the whole garment up–just deepen the angle of the seam as it goes toward the arm. Good luck!
Interesting! I feel like I’m learning all kinds of ways in which my body is not the way it is in my mind’s eye. I actually DID use a 5/8″as opposed to 3/8″ seam allowance from the top back shoulder until the bottom back shoulder (I guess I should have written that, but honestly didn’t really remember that change when I was doing the write up). The shoulder dart came after that wasn’t near enough an adequate fix. You might be right that I just need both!